How to Achieve Perfect Selfie Segmentation and Background Removal
Project Goal
The project aims to perform image segmentation on selfie images, see how we can blur the image's background, and even replace the background with some other solid colour like black.
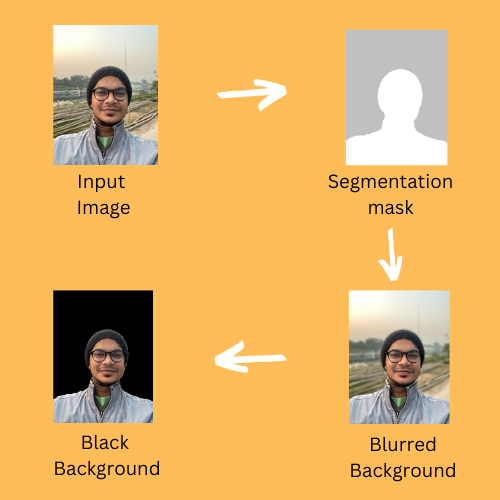
We will use a framework called MediaPipe to accomplish this task.
About MediaPipe
MediaPipe is an open-source framework developed by Google that allows developers to build and deploy cross-platform multimodal machine learning models. The framework provides a set of reusable components for tasks such as object detection, hand tracking, facial landmark detection, and gesture recognition.
One of the key features of MediaPipe is its ability to process real-time streaming data, making it well-suited for applications such as augmented reality and video surveillance. The framework also supports on-device and cloud-based deployment, allowing developers to choose the best option for their specific use case.
The MediaPipe ecosystem includes several pre-built solutions for common tasks, such as the Hand Tracking solution, which can detect and track hands in live video streams, and the Object Detection solution, which can detect and classify objects in images and videos. These solutions can be easily integrated into new or existing applications using the MediaPipe framework.
Code
For this project, we will use Google Colab. Create a new notebook in Colab.
You can think of all the code snippets below are the cells of the colab notebook.
Install Dependencies
1%%bash
2pip install mediapipe
Upload Image
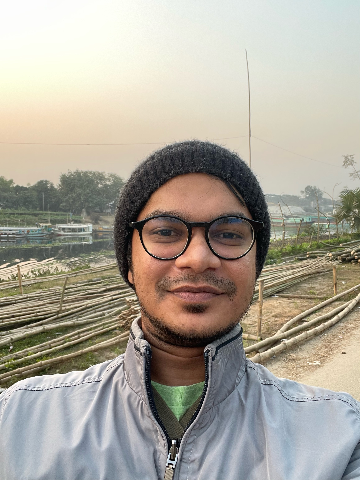
Upload any person's image to the Colab on which you want to perform the segmentation.
1from google.colab import files
2uploaded = files.upload()
This will let you upload files on the Colab environment. Let's say, I have uploaded the following image.
Pre-Processing and Display The Images
 1import cv2
 2from google.colab.patches import cv2_imshow
 3import math
 4import numpy as np
 5
 6DESIRED_HEIGHT = 480
 7DESIRED_WIDTH = 480
 8
 9def resize_and_show(image):
10  h, w = image.shape[:2]
11  if h < w:
12    img = cv2.resize(image, (DESIRED_WIDTH, math.floor(h/(w/DESIRED_WIDTH))))
13  else:
14    img = cv2.resize(image, (math.floor(w/(h/DESIRED_HEIGHT)), DESIRED_HEIGHT))
15  cv2_imshow(img)
16
17
18# Read images with OpenCV.
19images = {name: cv2.imread(name) for name in uploaded.keys()}
20
21# Preview the images.
22for name, image in images.items():
23  print(name)
24  resize_and_show(image)
This code sets a desired height and width for images, defines a function called resize_and_show which takes an image as input, resizes the image based on whether the image's height is less than or greater than its width, and then displays the image using the cv2_imshow function from the google colab library.
It then reads in a set of images using OpenCV which has been already uploaded in Google Colab in the previous step, and calls the resize_and_show function on each image. Which displays each of the image.
Import Required Module for Selfie Segmentation
1import mediapipe as mp
2
3mp_selfie_segmentation = mp.solutions.selfie_segmentation
If you want to change the model selection parameter during the initialization. Run help(mp_selfie_segmentation.selfie_segmentation) to get more informations about the parameter. Like below:
1help(mp_selfie_segmentation.SelfieSegmentation)
MediaPipe Selfie Segmentation provides two models: general and landscape. Both models are based on MobileNetV3, with modifications to make them more efficient.
The general model operates on a 256x256x3 (HWC) tensor, and outputs a 256x256x1 tensor representing the segmentation mask. The landscape model is similar to the general model, but operates on a 144x256x3 (HWC) tensor. It has fewer FLOPs than the general model, and therefore, runs faster. Note that MediaPipe Selfie Segmentation automatically resizes the input image to the desired tensor dimension before feeding it into the ML models.
Display Segmentation Masks
 1BG_COLOR = (192, 192, 192)   # gray color for the background
 2MASK_COLOR = (255, 255, 255) # white color for the mask
 3
 4with mp_selfie_segmentation.SelfieSegmentation() as selfie_segmentation:
 5  for name, image in images.items():
 6    # Convert the BGR image to RGB and process it with MediaPipe Selfie Segmentation.
 7    results = selfie_segmentation.process(cv2.cvtColor(image, cv2.COLOR_BGR2RGB))
 8
 9    # Generate solid color images for showing the output selfie segmentation mask.
10    fg_image = np.zeros(image.shape, dtype=np.uint8)
11    fg_image[:] = MASK_COLOR
12    bg_image = np.zeros(image.shape, dtype=np.uint8)
13    bg_image[:] = BG_COLOR
14    condition = np.stack((results.segmentation_mask,) * 3, axis=-1) > 0.2
15    output_image = np.where(condition, fg_image, bg_image)
16
17    print(f'Segmentation mask of {name}:')
18    resize_and_show(output_image)
The above code is using OpenCV and MediaPipe library to segment images, it uses the MediaPipe Selfie Segmentation library to separate the background and the foreground of the image. The code then converts the image from BGR to RGB using the cv2.cvtColor() function to ensure that the image is in the correct format for processing. Then the image is processed with the MediaPipe Selfie Segmentation library, resulting in a mask of the foreground. The code then creates an output image by replacing the pixels in the mask with a specified color, and the pixels not in the mask with another specified color. Finally, the output image is displayed using the resize_and_show(output_image) function.
OpenCV, by default, reads images in the BGR format, whereas most image processing libraries and libraries for displaying images expect images to be in the RGB format. The main difference between BGR and RGB color spaces is the order of channels. In BGR, the channels are ordered Blue, Green, and Red, while in RGB they are Red, Green, and Blue. This difference can lead to unexpected results when working with image processing libraries that expect images to be in the RGB format.
This code will display the mask like below:

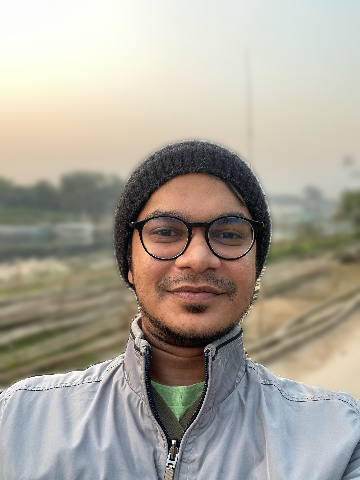
Blur the image background based on the segementation mask
 1# opens the MediaPipe Selfie Segmentation library and assigns it to the variable 'selfie_segmentation'.
 2with mp_selfie_segmentation.SelfieSegmentation() as selfie_segmentation:
 3
 4  #  iterates over the items in the 'images' dictionary
 5  for name, image in images.items():
 6    # Convert the BGR image to RGB and process it with MediaPipe Selfie Segmentation.
 7    results = selfie_segmentation.process(cv2.cvtColor(image, cv2.COLOR_BGR2RGB))
 8
 9    # Apply a Gaussian blur to the image.
10    blurred_image = cv2.GaussianBlur(image,(55,55),0)
11
12    # compares the segmentation mask with a threshold of 0.5.
13    condition = np.stack((results.segmentation_mask,) * 3, axis=-1) > 0.5
14
15    # create an output image by replacing the pixels in the mask with the original image and
16    # the pixels not in the mask with the blurred image.
17    output_image = np.where(condition, image, blurred_image)
18
19    print(f'Blurred background of {name}:')
20
21    # display the output image
22    resize_and_show(output_image)
This code will output an image like below:

Let's increase the intensity of the blurriness. Let's iterate the image 4 times through the GaussianBlur.
 1num_blur_iterations = 4
 2
 3with mp_selfie_segmentation.SelfieSegmentation() as selfie_segmentation:
 4  for name, image in images.items():
 5    # Convert the BGR image to RGB and process it with MediaPipe Selfie Segmentation.
 6    results = selfie_segmentation.process(cv2.cvtColor(image, cv2.COLOR_BGR2RGB))
 7
 8    blurred_image = image
 9    for i in range(num_blur_iterations):
10        blurred_image = cv2.GaussianBlur(blurred_image,(55,55),0)
11    condition = np.stack((results.segmentation_mask,) * 3, axis=-1) > 0.1
12    output_image = np.where(condition, image, blurred_image)
13
14    print(f'Blurred background of {name}:')
15    resize_and_show(output_image)
Output Image would look like below:
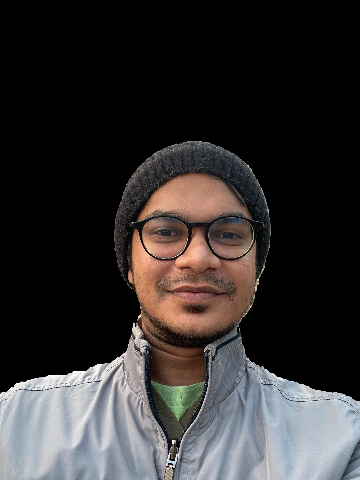
Change The Background to Black
Now, let's change the background to black instead of making it blurred.
 1with mp_selfie_segmentation.SelfieSegmentation() as selfie_segmentation:
 2  for name, image in images.items():
 3    # Convert the BGR image to RGB and process it with MediaPipe Selfie Segmentation.
 4    results = selfie_segmentation.process(cv2.cvtColor(image, cv2.COLOR_BGR2RGB))
 5
 6    # create a black image with the same shape as the original image
 7    black_image = np.zeros(image.shape, dtype=np.uint8)
 8    condition = np.stack((results.segmentation_mask,) * 3, axis=-1) > 0.5
 9    output_image = np.where(condition, image, black_image)
10
11    print(f'Black background of {name}:')
12    resize_and_show(output_image)
This will output an image like below:
The source code can be found here in this Github Repository.
Author: Sadman Kabir Soumik
Posts in this Series
- How to Achieve Perfect Selfie Segmentation and Background Removal
- Building an Instagram Auto-Liker Bot - A Step-by-Step Guide
- Working with Elasticsearch on Linux Using Python Client
- Multi-class Text Classification Using Apache Spark MLlib
- Keyphrase Extraction with BERT Embeddings and Part-Of-Speech Patterns
- Bypass reCAPTCHA And Prevent IP Blocking Using Tor Proxy